OAuth is a widely-used industry standard for securely accessing user information without giving access to their passwords.
It can get pretty complicated, but it’s important to understand it at least a little if we want to use it. There’s no need to get in the weeds on this topic, but a high-level understanding is very useful.
So in this article I’ll give an overview of how it works, and why we use it for authentication in our Nuxt 3 apps — including the app we build in Mastering Nuxt 3.
OAuth Basics
Let's say you want to create a Twitter bot that will automatically tweet out your favourite quotes.
Instead of giving the bot all of your login information (which is not a good idea), you can use OAuth to securely provide access to your Twitter account.
OAuth involves four pieces:
- The user — this is the person whose information is being accessed.
- The resource server — the server that holds the user's information. This could be a website or service such as Twitter, Google Drive, or an email server.
- The client or third-party app — the app or service that wants to access the user's information on the resource server on their behalf.
- The authorization server — the server that controls access to the resource server. This server is responsible for authenticating the user and issuing a user token to the client app, which can then be used to access the user's information on the resource server.

In the case of our Twitter bot, the pieces would be:
- The user — you, the person that wants to give the Twitter bot access to your account.
- The resource server — this is Twitter's API, which holds all of the user's information such as their tweets, followers, and other data.
- The client or third-party app — this is the Twitter bot itself.
- The authorization server — this is Twitter's authentication service.
Now that we have all of our pieces in place, we need to see how they interact with each other.
Here’s what the OAuth flow would look like for our Twitter bot example:
- The user clicks on a "Log in with Twitter" button in the Twitter bot app or service.
- The app or service redirects the user to Twitter's authorization server.
- The user logs in to their Twitter account (or confirms that they are already logged in).
- Twitter's authorization server authenticates the user and redirects them back to the app or service with a user token.
- The app or service receives the user token and uses it to access the user's information on Twitter's API.
- The app or service can now perform actions on behalf of the user, such as posting tweets or retrieving the user's timeline.
To use our bot, the user would first hit a login button on the app. The app would then redirect the user to Twitter's authorization server, where the user's authentication would be handled.
Once the user is authenticated, Twitter's authorization server would redirect the user back to the app with a user token. The Twitter bot can then use this user token to access the user's information on Twitter's API.
It's important to note that at no point in this process does the user's Twitter login credentials pass through the Twitter bot — it’s completely secure.
Instead, the user's authentication is handled by Twitter's authorization server, and the Twitter bot is only provided with a secure user token to access the user's information on Twitter's API. This ensures that the user's login information remains safe and secure.
OAuth is all about using these tokens to represent access.
Using OAuth for Authentication
Sometimes, however, we don’t actually need to access anything on the resource server.
In the case of the app we’re building in Mastering Nuxt 3, we’re using OAuth with Github, but we don’t need access to any repos. Our app doesn’t need to create or merge PRs or anything like that.
Instead, we’re only using the OAuth flow for authentication — to verify the user’s identity.
Once we get that token back, we’re set. That access token contains all of the information we need about the user, and proves their identity.
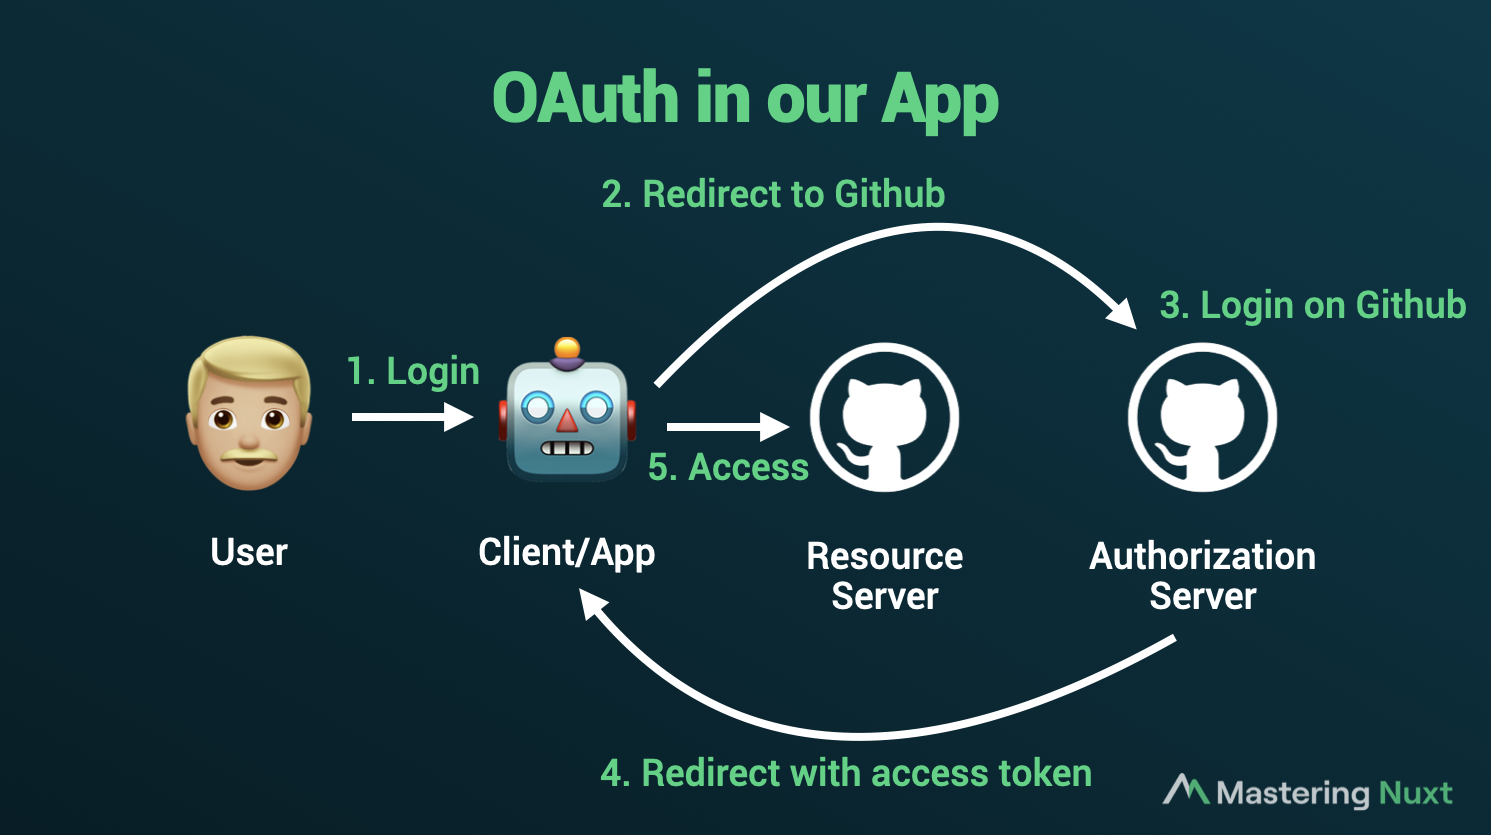
So the basic OAuth flow in our application would look like this:
- The user clicks "Log in with Github"
- Our app redirects to Github's authorization server
- The user logs in to Github (or is already logged in)
- Github redirects back to our app with a user token containing information about the user
- Our app can now grant access to the user for viewing the lessons
In our course platform, the resource "server" is the app itself, and we mostly just want to use the authentication server for convenience for both us and our users. This eliminates the need for user to create extra accounts and for us to deal with security, password resets, and everything else.
Learning more about OAuth
The detailed flow of how OAuth actually works can get quite complicated, but it's not necessary to understand it completely in order to use it in your application.
This is why we have auth providers like Supabase, Firebase, and Auth0 (and many more)!
But if you do want to learn more, there are great resources available. It took me a long time to grasp OAuth, and I watched many videos and read many articles before it finally clicked for me.
One great resource to learn more about OAuth is https://oauth.net/.